Inspirational Air Conditioning
My air conditioner is what jump started my adventure with Home Assistant last year and since then it has inspired several other projects along this journey. This time my goal was to get a peak behind the curtain and see some details that Lennox didn’t feel was necessary to share with the users. The AC system has a two stage compressor which allows it to more efficiently maintain the desired temperature. Also, the thermostat can cycle the system to meet a humidity set point as the typical temperature set point. These are two nice features but Lennox filters the data that is presented to the user. I am allowed to know the system is cooling but not which stage is in use, and I can look at the thermostat and know it is dehumidifying but that status is not relayed to the cloud API. The driving reason for this project is why I started this automation adventure to begin with. I want to change the system fan mode to circulate if the compressor hasn’t run in at least 24 hours. Since Lennox fails to report all compressor use to the API, I needed a sensor to spy on the compressor. With that data in HA, I can combine it with the Lennox cloud data and calculate what the system is actually doing at all times. All the data I need for my automation will finally be available.
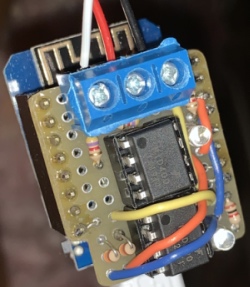
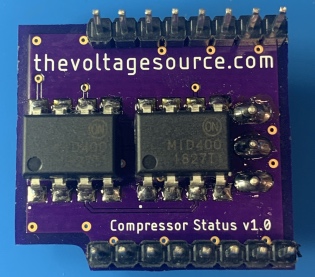
The AC control board has two 24 VAC signal wires going out to the compressor. The first gets powered to activate stage one and both are powered when stage two is requested. Throw in a wire connected to common and it seemed like a fairly easy circuit to monitor. I found an AC to DC logic optocoupler (Fairchild MID400) and decided I would build a shield for a Wemos D1 Mini. I had previously done a similar setup to control and monitor my garage door so this one wasn’t much of a challenge to get working. I even reused the garage control code with only minor modifications.
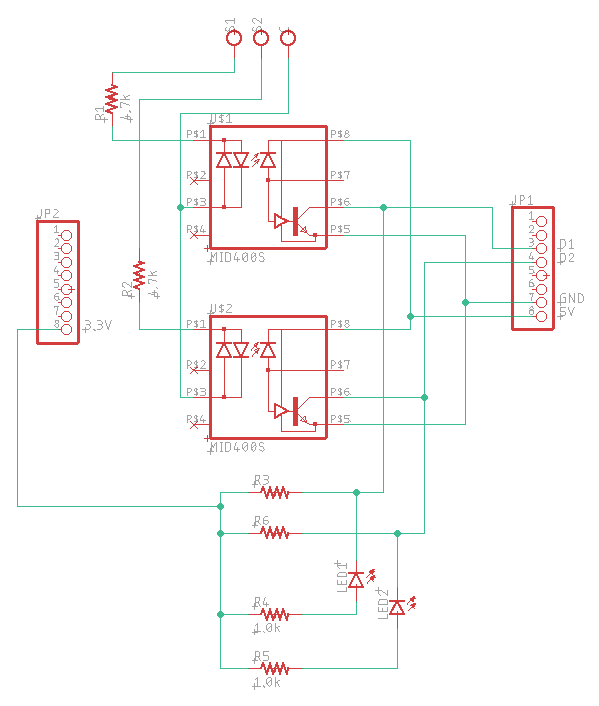
As I looked at my second completed protoboard shield, I decided it was time to take the plunge into PCBs. Since the AC is what started this whole journey I decided that the compressor status board would be the first to get the upgrade. Now I have to admit, I did learn AutoCAD Eagle making a PCB last year, but that was for a business venture and was a group project. It was time to do one for myself, because I knew I could. So I fired up Eagle and started drawing out the schematic. Of course the MID400 isn’t a standard part so I had to draw it up and make sure I had a footprint that met the data sheet requirements.
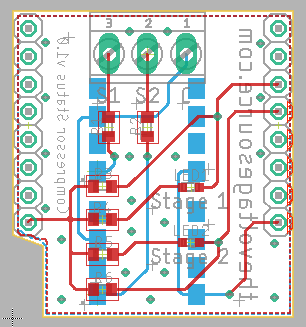
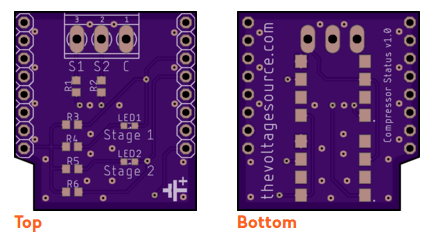
Like a good engineer, I did the board layout while on vacation. There aren’t a lot of parts in my circuit but I took my time because I wanted it to look nice. One thing that I failed to grasp on this board and the previous one I did, was the scale of what I was designing. It looks huge on the computer screen with plenty of room between parts, but when you translate viewable .1 mm grid lines into a physical product, you need some serious magnification to see that level of detail. I couldn’t remember the size of the leftover SMD components I had at home so I picked 0603 for this board. I would eventually realize two things, I had 1206 parts at home and WOW! those footprints are tiny in real life. With the board layout to looking good, I generated the gerber files and uploaded them to OSH Park. After a few tweaks, the board OSH Park was going to produce looked like the board I wanted. For only $5.65, my design was being fabricated and three purple PCBs would be arriving at my house in about 2 weeks!
I have known how to work a soldering iron for more that 25 years, and how to do it properly solder since college. With that PCB I helped produce last year I decided learning to solder SMD parts on the job would not be wise, so we paid an expert. But I really wanted to try and now I had the chance. This project was just for me and I had three PCBs in case I royally messed up.
My wife and son gave me a soldering mat and a pair of jeweler loupe glasses for Christmas last year to help me up my nerd cred and I put them to good use on this project. Even with 2.5x magnification, 0603 components are tiny. I lost one while pulling it out of the packaging and it might be because I breathed in too quickly and inhaled it. I may never know. Now I have been told that everyone solders SMD parts a little differently so if this helps you, cool, if you have ideas to help me, leave a comment below. Based on the directions I read online, I dabbed a little flux on the pads where my part was about to be placed to keep it from wandering away, as well as aid in the solder flow. Using tweezers I placed the component on the board, put a bit of solder on my iron, put pressure on the component with the tweezers, and touched the soldering iron to one side. I only have two hands like most of you, so that process was a bit of a juggling act, but it worked. I touched the other side of the component with the solder ladened tip and the first component was in place. Rinse and repeat, and eventually all of the components were attached to the board. It wasn’t all smooth sailing but the end result looks pretty good.
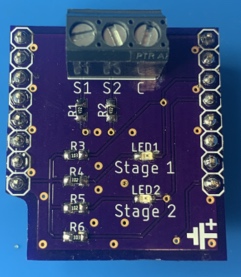
Since I already had the protoboard working and hooked up to the AC, it was quick to swap out one shield for another. I gave it a quick test and it worked with only one issue. To simplify the board layout I had swapped which input pins I used for stage 1 and stage 2. Hardware wise everything worked great and changing two config lines in the software is a simple fix. I do have two more PCBs I can build out for practice and I have a couple of things I would like to change on the design, but it works! Unless I start getting requests to make these for people, I should probably focus my limited hobby time on making the garage controller PCB and not on perfecting this one. This project is done. It just needs a blog post to make it official.
Now, to build that automation…
Jacob
2 thoughts on “Inspirational Air Conditioning”
Lennos Icomfort
I’m trying to be able to “set” fan_mode on my system. I’m told you might be able to help.
I have a UVC lamp installed and my fan keeps going to “Auto” which means not running unless need heat/cool.
Thanks
Hi Chuck, If you can give me a little bit more info I might be able to help you hunt down the issue. Do you have the thermostat tied into an automation system that might be reverting settings? Are you changing the fan mode directly on the thermostat or are you doing from a remote app?